Vehicle lettering is one of the best ways to promote your business on the go and can be applied to a truck, van, or trailer. For example, if you are a plumber, landscaper, or really any delivery service, you would be on the road driving to your location in your vehicle. Why not have it passively promote your business
Vehicle lettering essentially is a driving billboard that promotes your business wherever you go. Your car decals work overtime to advertise your organization in ways that are visually striking, effective, and economical.
Insights About Truck & Vehicle Lettering
The process of lettering your vehicle is simple and can be done yourself. You can conveniently buy lettering from online platforms and apply it to your vehicle within a few minutes.
There are three layers to your vehicle lettering itself:
- The top layer – Is a masking tape that holds the letters in place for seamless installation.
- The middle layer – is made of vinyl lettering.
- The bottom layer – is made of white wax paper backing, which safeguards the vinyl lettering and the adhesive.
Keep the Font Large
If you want your car signs to be visible even from far-off distances and be eye-catching to onlookers, ensure that the letters you purchase are at least three inches tall. You can further increase visibility by using five-inch-long lettering.
Use a Contrasting Shade for Fonts

Choosing lettering that contrasts with the color of your vehicle will ensure greater noticeability even during peak sunshine. Choose colors based on the color of your vehicle so that onlookers can catch your business’ name even with a glance. If you’re unsure what colors to pick, white or black are safe options to use.
Pick a Slogan
Choose a straightforward slogan for your vehicle’s lettering that promotes your brand while keeping it subtle. The ideal length for vehicle lettering slogans is five words or fewer, followed by the relevant contact information, including phone number and website.
Make your slogan brief and sweet and crop out not-so-relevant details to ensure that onlookers can quickly go through your entire content within seconds.
Make your Lettering Catchy
To ensure that your lettering draws attention, highlight it by increasing its visual appeal. For example, you can outline the lettering, use a simple yet elegant design, or underline the lettering with a straight line or a wave. You can also use reflective lettering to make it more eye-catching, especially at night or low lit areas.
Tips for Applying Truck & Vehicle Lettering
Once you have thought of the physical characteristics of your lettering, gather the necessary materials to ensure proper application. After that, there are six steps to properly apply your lettering to your vehicle!
- Bowl
- Lettering
- Dish soap
- Level
- Squeegee
- Sponge
- Ruler
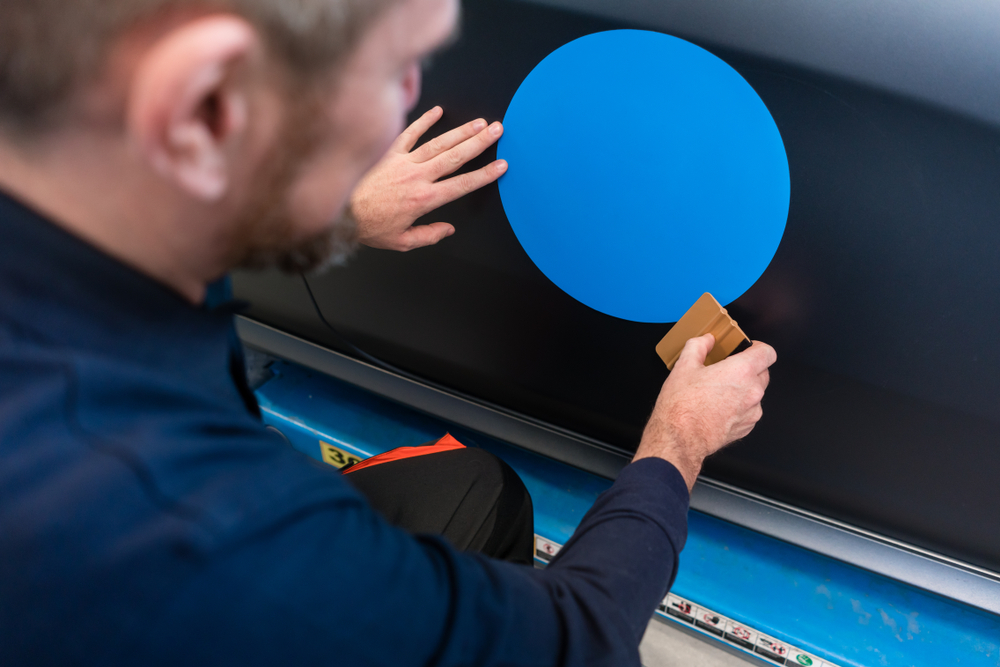
Step 1: Keep your Hands and the Vehicle Clean – Before moving on with the application process, you must ensure that your hands and the vehicle are free from dust and oil. Vehicle lettering will not stick properly on a dirty surface and will come off eventually. It is crucial to thoroughly clean the area of your vehicle where you would be applying the lettering.
Step 2: Prepare a Solution of Dish Soap – Pour in a few drops of dish soap in a cup containing water and reserve in a bowl. There are options to apply the lettering through a dry method, if you do not want to use dish soap. However, it will be simpler and more efficient to apply using a wet method.
Step 3: Make Proper Markings Before Installation – Hold the lettering against your vehicle on the application area, or measure the spot where you wish to apply the lettering using a ruler. To mark the area of application, use masking tape or a grease pencil.
Step 4: Cover the Marked Area with the Dish Soap Solution – Cover the entire area where you wish to apply the lettering with the dish soap solution and make it fully wet before application.
Step 5: Application – Pull off the backing from the lettering and stick it against the marked area. Ensure that the vinyl letters and numbers are placed evenly and spaced using a level.
Step 6: Render a Clean Finish – Apply the lettering slowly to avoid having air bubbles. If you end up with air pockets after applying the lettering, you can use cardboard or your palms to push them out. This step is also essential to push out the excess liquid solution.
Final Words
Vehicle and truck lettering can provide brand visibility and make people want to know more about the products and services offered by your business. It’s an easy installation process and vehicle lettering a reliable, cost-effective, and seamless approach to promoting your business.
 Posted in