
The Best Trade Show Guide for New Exhibitors: Tips, Strategies, and Must-Haves
February 6, 2025
Setting up an outdoor display or vendor booth usually feels like a job meant for two or three people. When you arrive at an event alone, unbagging a heavy steel or aluminum frame can seem intimidating. However, learning how to set up a canopy tent on your own is simple once you master a few leverage techniques.
Whether you are managing a weekend market stall, setting up a corporate registration table, or preparing an outdoor promo zone, solo installation requires method over muscle. By walking around the frame in cycles rather than forcing scissors trusses from one side, a single person can assemble a sturdy, professional shelter in under ten minutes.
In this comprehensive guide, we will walk you step-by-step through solo opening, canopy placement, height adjustment, essential anchoring safety, and smooth teardown.
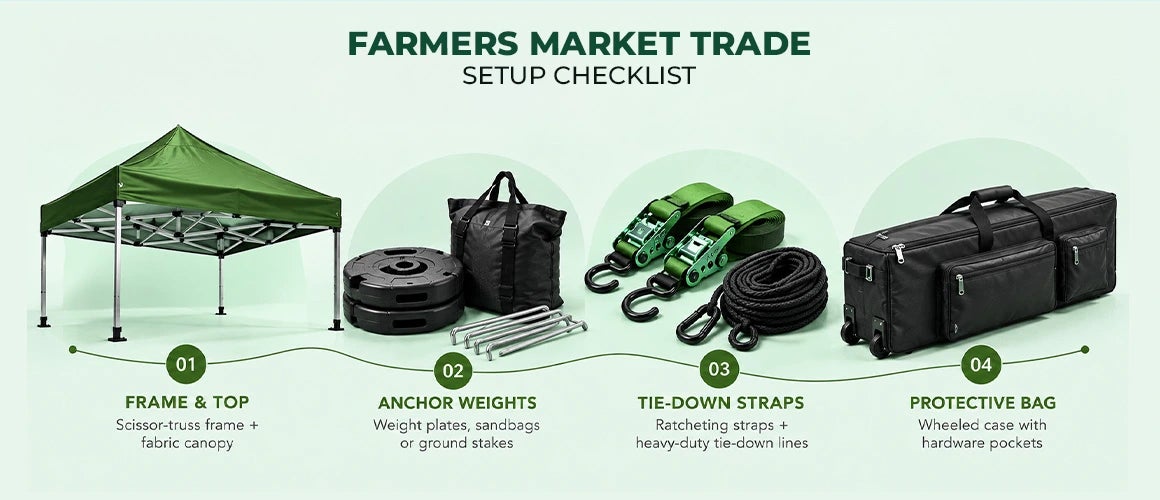
Before starting your assembly, gather all your equipment near the setup spot. Unpacking everything beforehand prevents running back and forth to your vehicle once the frame is standing.
Setup Checklist
Always have your weight anchors within arm’s reach before raising the frame roof.
Executing a smooth, stress-free canopy tent setup without assistance relies on working incrementally. Forcing one corner expanded while the opposite side stays closed can bend or snap internal truss bars.
1. Unpack and Position: Unzip your roller bag and stand the frame vertically on flat ground where you want your center point. Double-check for overhead power lines or low tree branches before expanding.
2. Walk the Frame Out Partially: Grab two opposing outer legs or lower truss bars. Lift the frame slightly off the floor and step backward slowly. Expand the accordion structure to roughly 50% capacity. Do not try to open it all the way yet.
3. Attach the Canopy Fabric: If your roof cover is separate, drape it over the partially opened frame. Align the fabric corners with the frame top posts. Secure any inner velcro straps around the top trusses and lock the corner pockets down.
4. Lock the Four Frame Corners: Walk to each of the four corner sliders. Place one hand on the top truss bar and your other hand on the sliding corner bracket. Push up until the push-button pin clicks into place. Repeat this process at all four corners so the roof structure becomes rigid.
5. Walk the Legs to Full Width: Step back to each leg, lifting slightly so the rubber feet glide over the grass or pavement. Rotate around the square frame, pulling each corner outward a little at a time until the roof truss is taut.
6. Extend the Telescoping Legs: Place your foot on the footpad of one leg. Lift the upper leg pole until the spring pin locks into the lowest height hole. Move diagonally across to the opposite leg and raise it to the same height. Repeat on the remaining two legs. Once all legs are elevated one notch, repeat the rotation to raise the structure to full operational height.
Following a structured approach to canopy tent assembly keeps structural stress low and guarantees your frame remains square.
Selecting the correct canopy footprint depends on your physical space, transport capacity, and booth requirements. While larger formats offer more shade, smaller structures are noticeably easier to manage alone.
A standard 10ft canopy tent provides 100 square feet of covered area, making it the most popular choice for tradeshows and vendor fairs. Choosing the right canopy tent sizes helps you match your shelter to your available space and booth requirements.
| Tent Format | Footprint (Feet) | Solo Setup Difficulty | Best For |
| Small Commercial | 6′ x 6′ or 8′ x 8′ | Very Easy | Ticket kiosks, narrow walkways, quick sampling stations |
| Standard Commercial | 10′ x 10′ | Moderate (Easy with practice) | Vendor stalls, craft fairs, corporate promotions |
| Large Event | 10′ x 20′ | High (Requires 2 people) | Multi-table exhibits, motorsports, team headquarters |
If you are setting up in tight spaces, using a compact 6ft canopy tent allows for effortless single-person handling without sacrificing professional visual appeal.
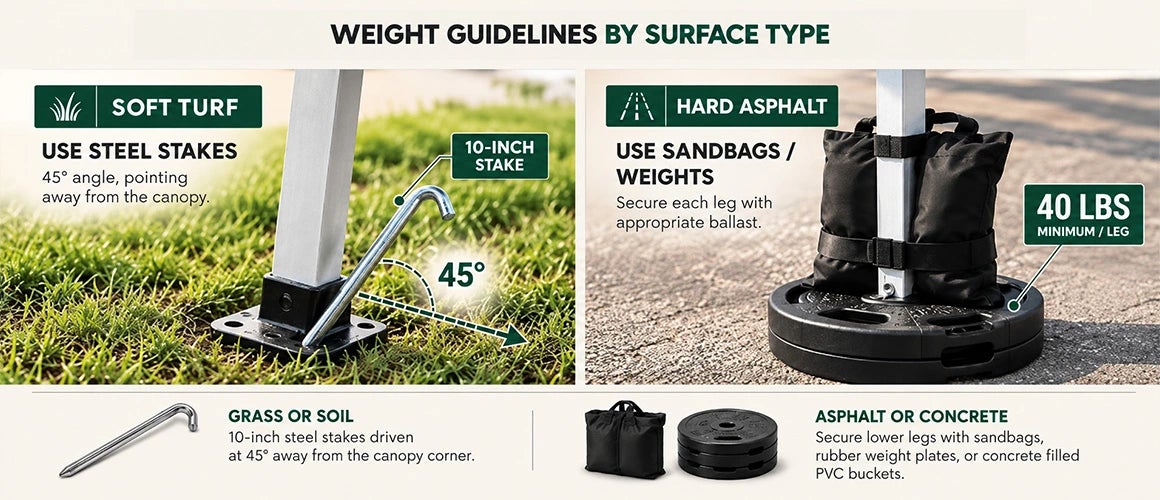
Knowing how to secure a canopy tent is the most critical step of any outdoor setup. A light breeze can turn an unweighted shelter into a dangerous sail, causing property damage or injury.
Understanding how to anchor a canopy tent safely means using a minimum of 40 pounds of weight per leg under normal weather conditions. Never rely solely on light plastic stakes provided in standard packaging.
When the event ends, executing a clean canopy tent take down requires reversing your setup sequence carefully.
How Do You Maintain and Store Your Frame Long-Term?
To extend the lifespan of your event hardware, follow these essential maintenance procedures:
Reviewing manufacturer canopy tent instructions periodically ensures you operate built-in locking latches properly without damaging internal springs.
Even experienced vendors encounter setup challenges occasionally. Here is how to address common field issues quickly:
If you are just starting out and need official setup guidelines, learning how to assemble a canopy tent step-by-step builds confidence for your next event.
Whether you choose a basic shelter or a fully branded pop-up canopy tent, taking time to master single-person mechanics keeps your event morning smooth and efficient.
For high-wind events or full retail brand activations, upgrading to a commercial custom canopy tent offers reinforced aluminum frames and heavy-duty fabric designed for long-term outdoor endurance.
If you are expanding your event presence beyond shelters, integrate cohesive outdoor displays like teardrop flags, printed table throws, and directional signage to capture customer attention from every angle.
Mastering single-person installation transforms event mornings from stressful to seamless. By walking the frame out incrementally, locking corners methodically, and applying heavy leg weights immediately, you ensure a safe and professional setup every time.
Ready to upgrade your outdoor event presence? Explore our full line of commercial pop-up shelters and accessories today!
Q. Can one person set up a pop-up canopy safely in windy conditions?
A. Setting up alone in high winds is dangerous. If you must set up in light breezes, anchor one side leg with weight plates immediately after opening the frame partially before lifting the roof.
Q. Should I remove the fabric top every time I pack the frame away?
A. Most modern pop-up models allow you to leave the polyester top attached during storage. However, if the canopy is wet, remove it immediately to air dry completely before long-term storage.
Q. How do I learn how to set up a pop-up canopy without straining my back?
A. Always lift with your legs and move around the perimeter in slow steps instead of pulling forcefully against a stiff, unexpanded frame.
Q. How much weight is required per leg for commercial event compliance?
A. Most professional event organizers require at least 40 pounds per leg (160 pounds total per 10×10 structure) to comply with local outdoor safety regulations.
Think about the last yard sign you actually noticed. Chances are that you did not stop reading a paragraph of…
If you have ever seen a graphic rise from a slim floor base at a trade show, store or reception…
Choosing the right window decals for your store or office depends on your primary goal, whether that means boosting storefront…
Outdoor vinyl stickers are an excellent choice for durability and aesthetics, but many users face the challenge of maintaining their…
Yard signs are a cost-effective and versatile way to get your message across whether you're promoting a local event, supporting…
Have you ever printed a banner, poster, or sign and found that the image looked blurry or pixelated? This happens…